VPN with Cisco Secure Client on MacOS
Preliminary note
Note General
Some restricted services of the University or the State and University Library can only be used when you are on campus, so that the device you use has an address from the area assigned to the University.
To access these services from home or on the road, you must install a so-called VPN client software (Cisco Secure Client or OpenConnect) on your device once and establish a connection to the campus with the VPN client before each access to the restricted services. This means that you are "virtually" on campus and can use the services you are used to.
Please note the different types of tunnels and make sure you choose the correct tunnel.
System Requirements
The Anyconnect client needs a up-to-date version of the MacOS operating system.
This means that your Mac needs to have at least one of the following MacOS versions installed:
- MacOS 13 (Ventura) Version 13.6.7 or higher
- MacOS 14 (Sonoma) Version 14.5 or higher
(Checked: 31. Mai 2024)
If your Mac has none of the versions above installed, update your mac at least to the versions described.
If you use MacOS 13, please try to update to MacOS 14 (if your device supports it).
Older versions of MacOS are not supported (neither by Apple, nor by the Cisco Secure Client).

Initial Setup - Step 1
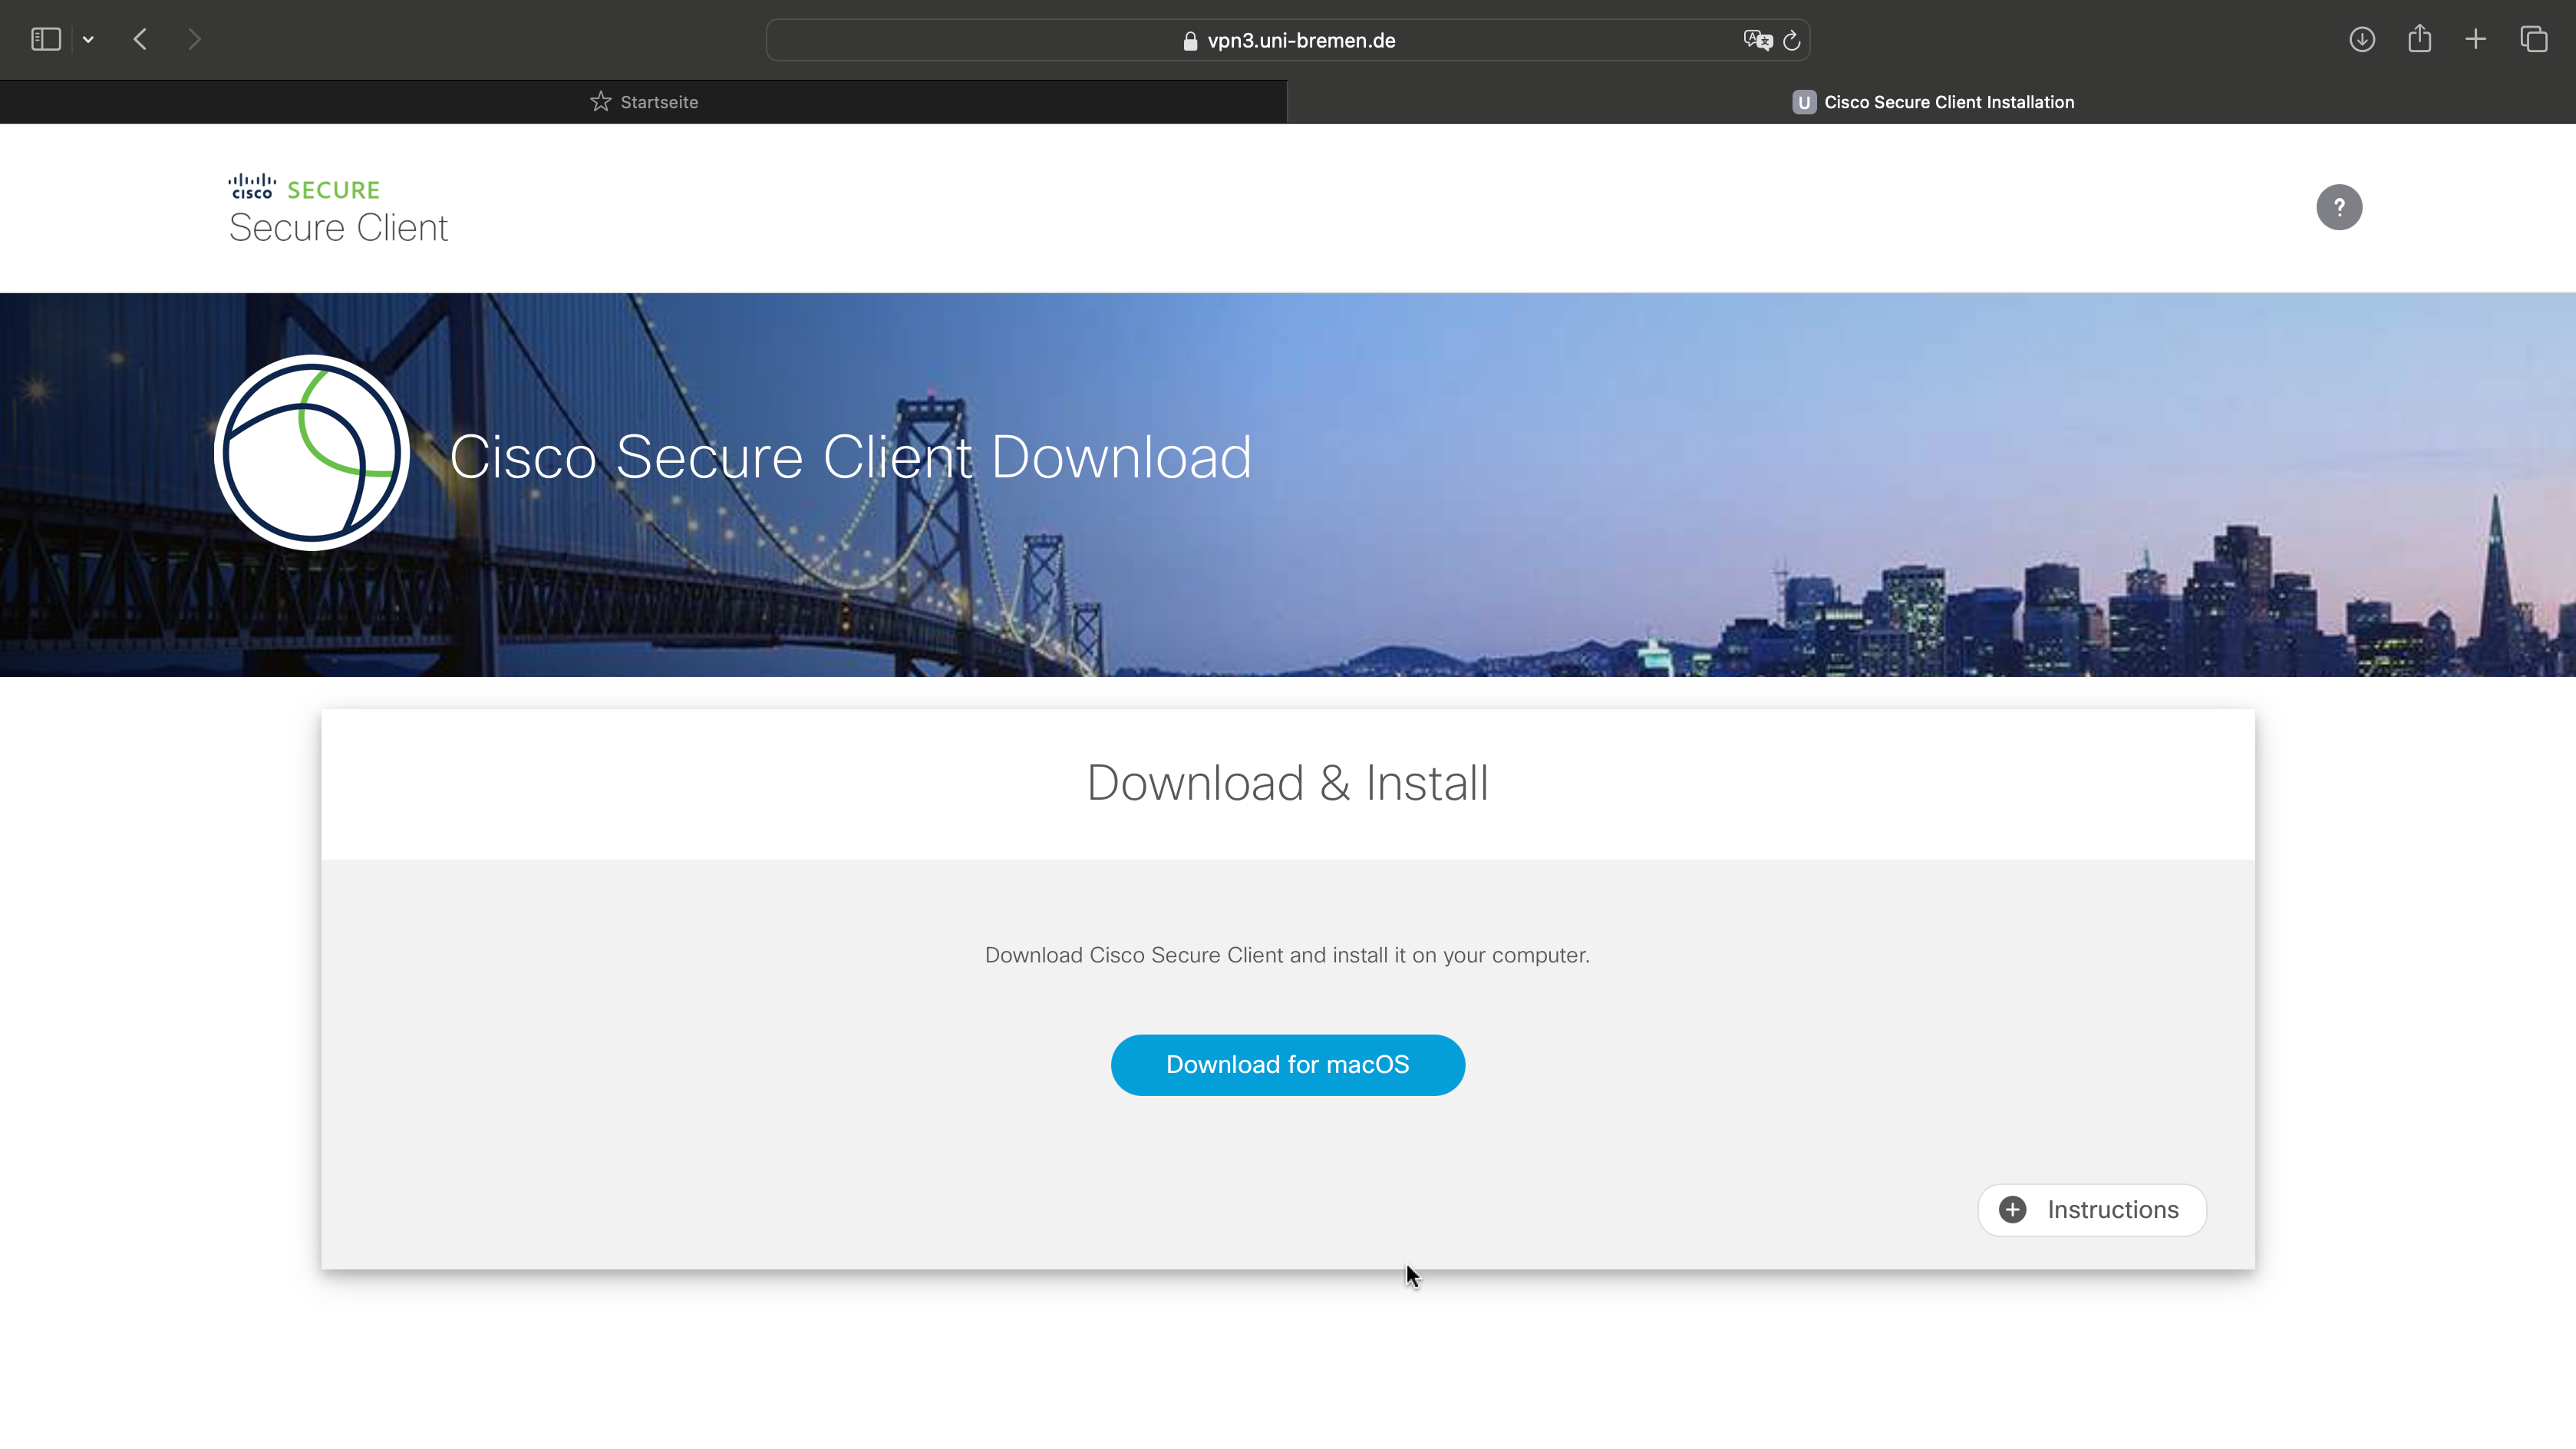
Make sure that your device is connected to the Internet. Open the website https://vpn.uni-bremen.de, log in with your university account and then download the installation file for Cisco Secure Client.
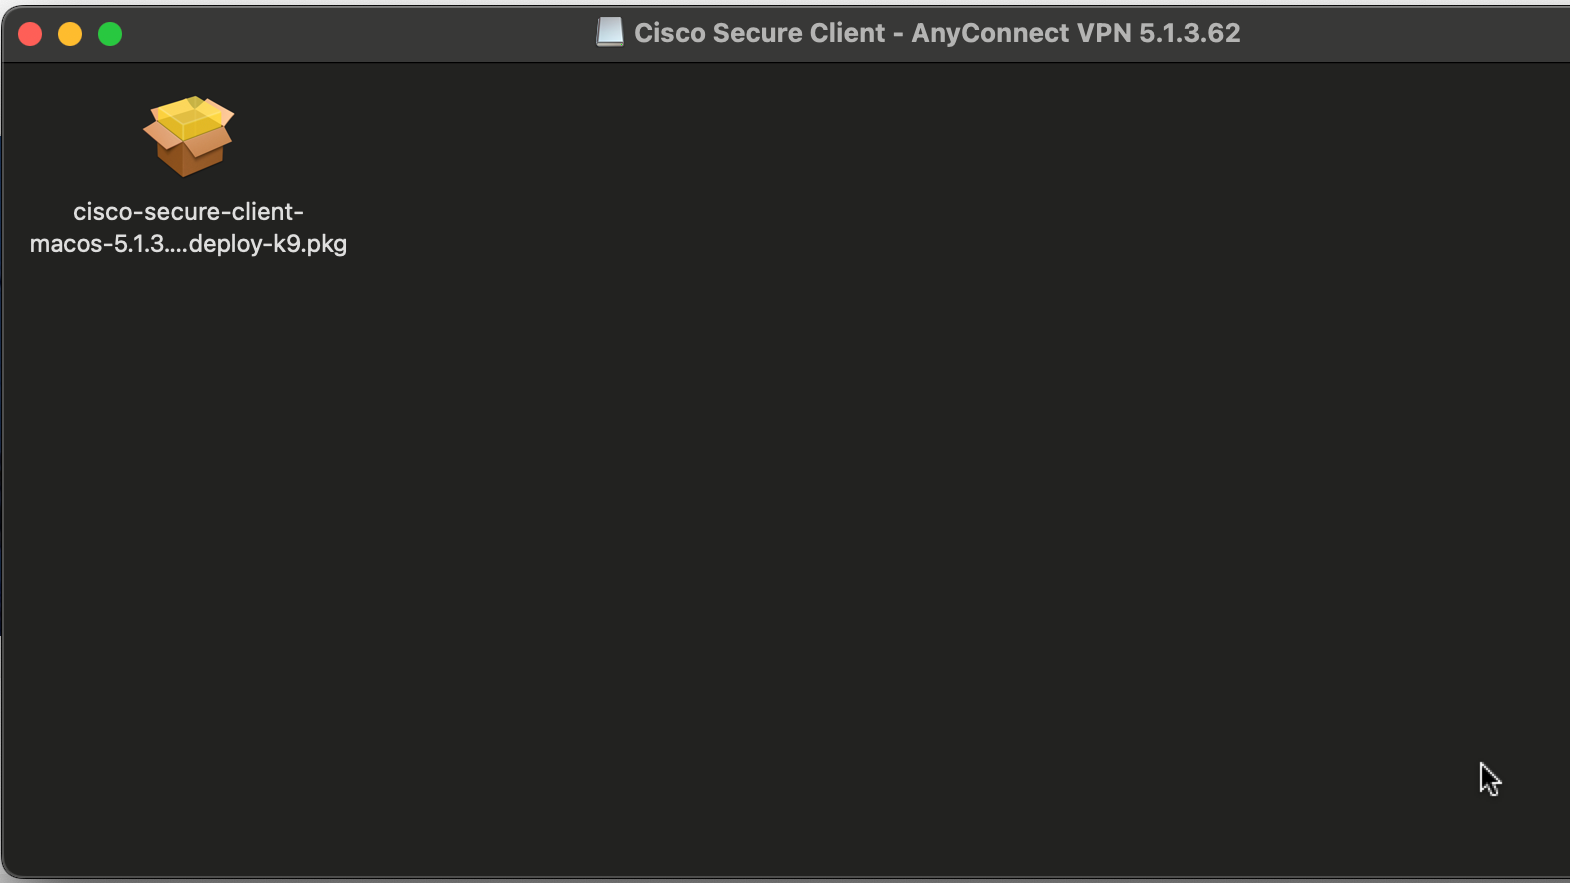
Then open the downloaded archive and open the.pkg file contained in it.
Initial Setup - Step 2
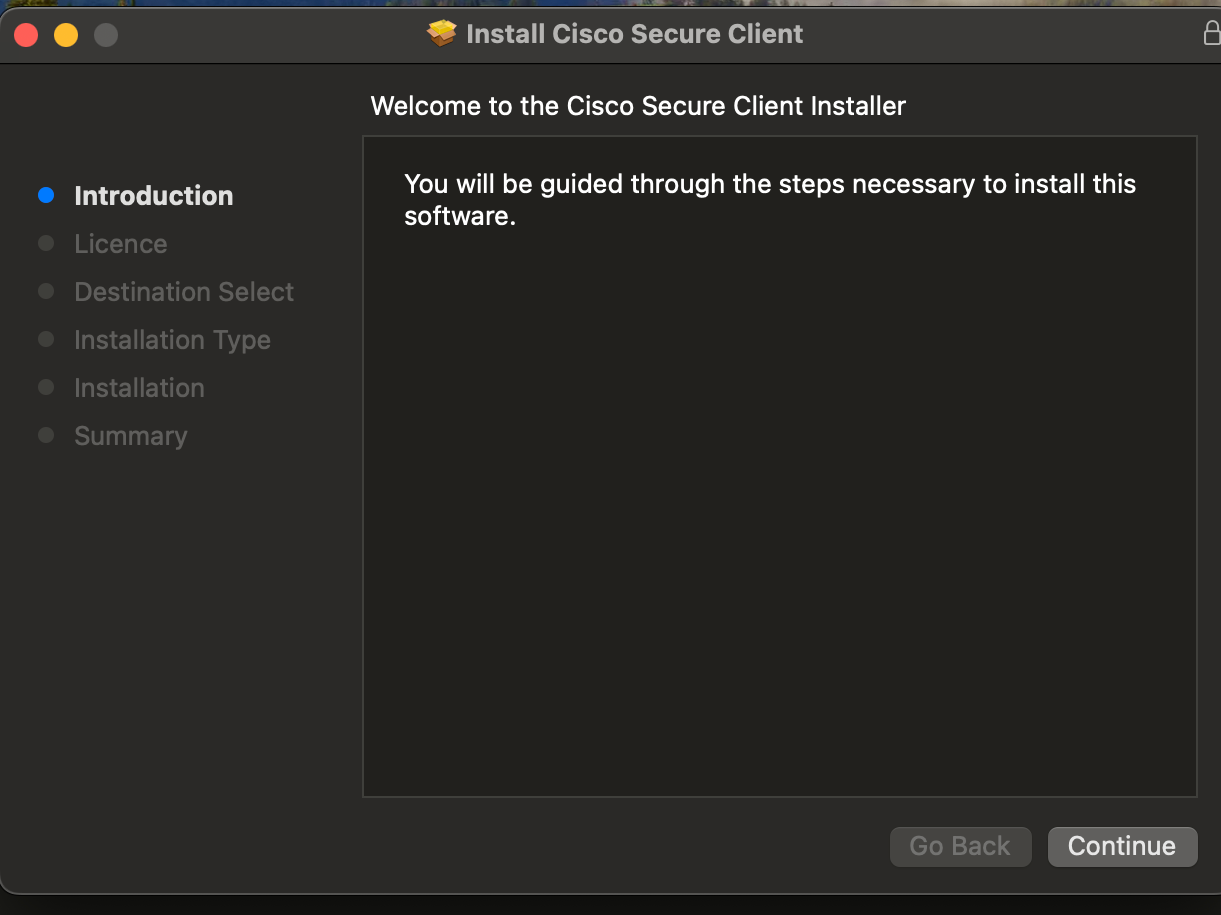
Then click "Continue" on the first dialog page.
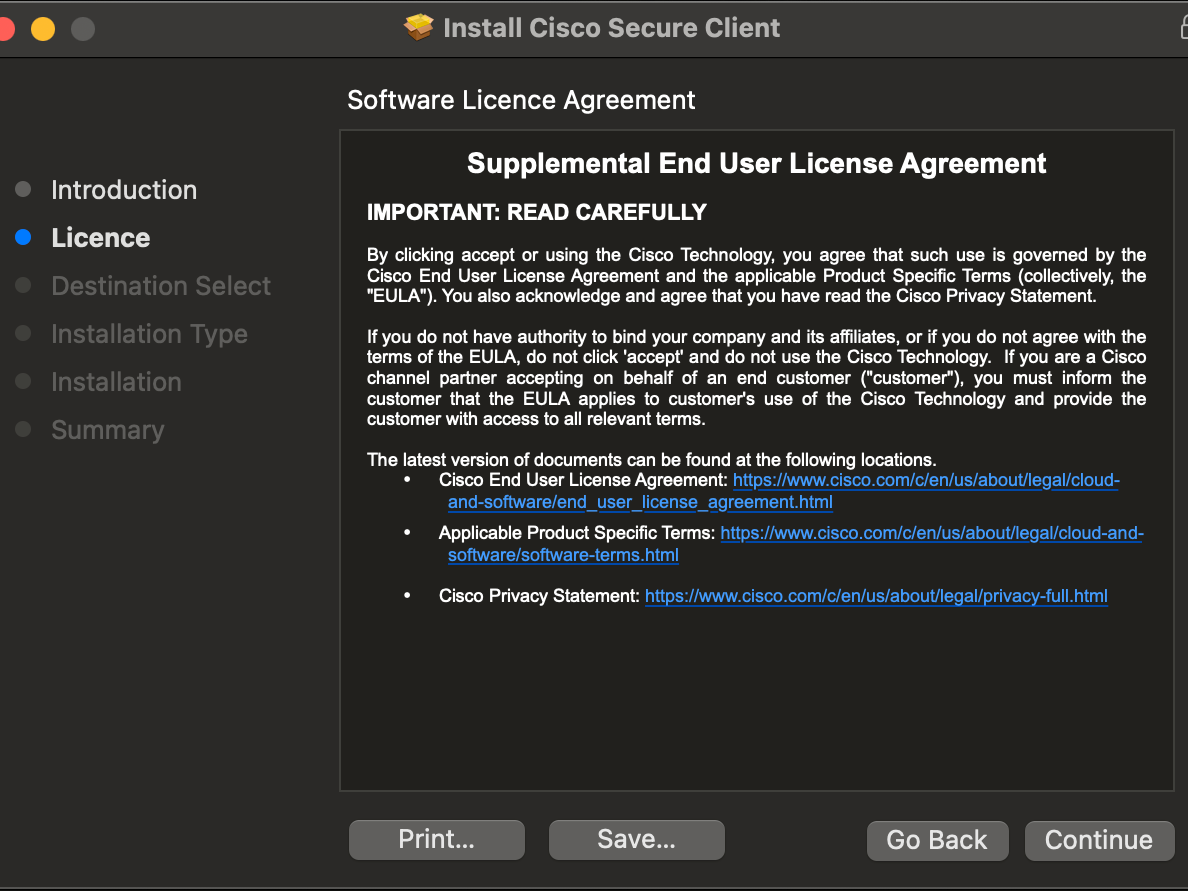
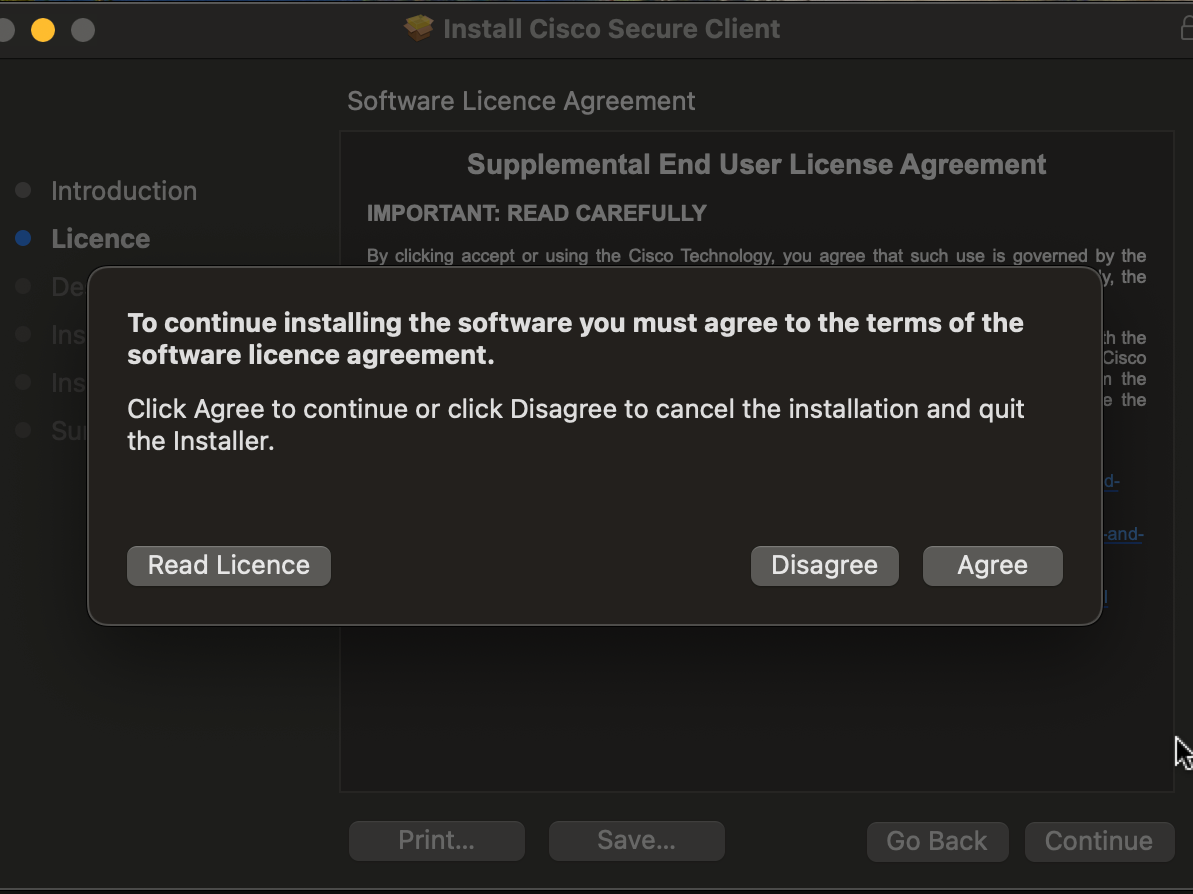
After that, read and accept the license terms. If you do not agree with the terms and conditions, you will not be able to use the VPN service.
Initial Setup - Step 3
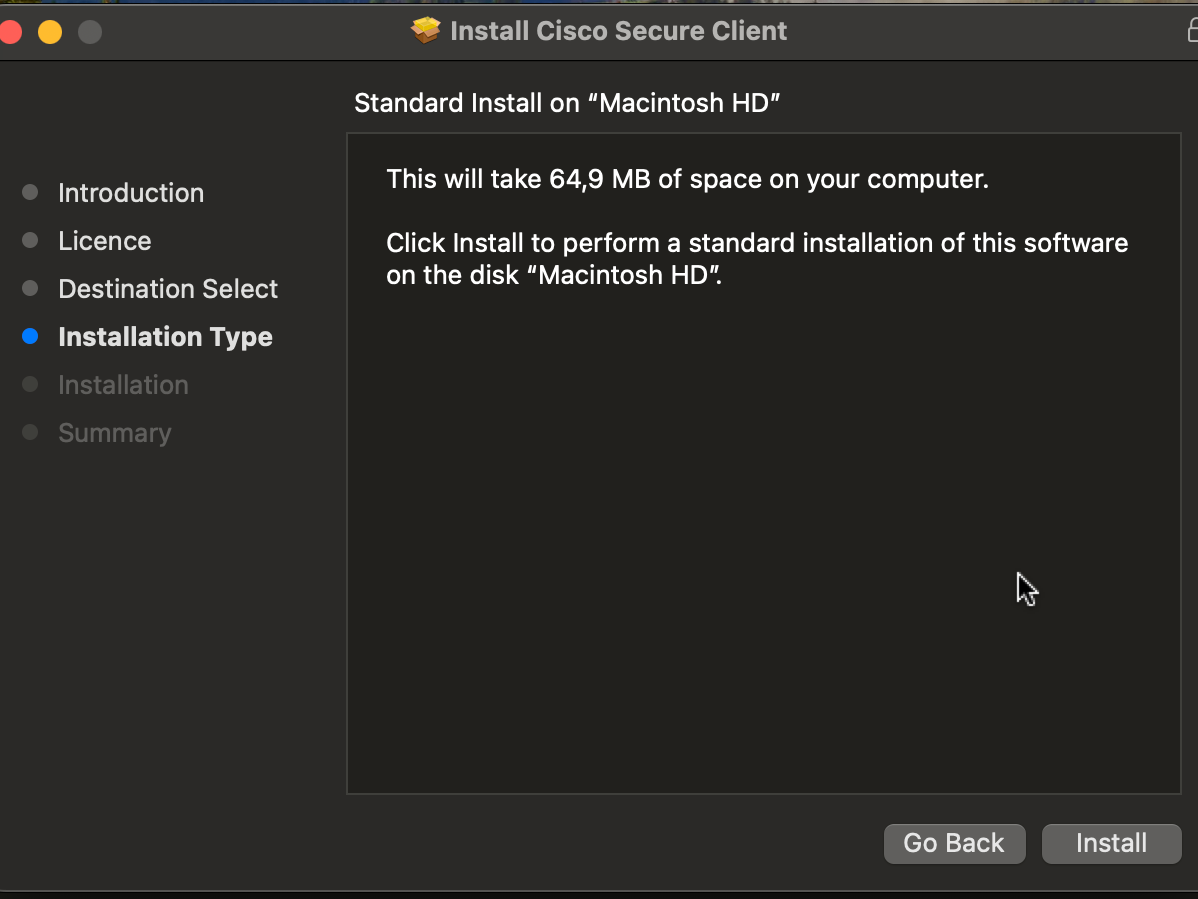
On some Macs the installer might ask you to select the install destination. If you only have one install destination the step is skipped. Usually the default installation location ("Macintosh HD") is already preselected.
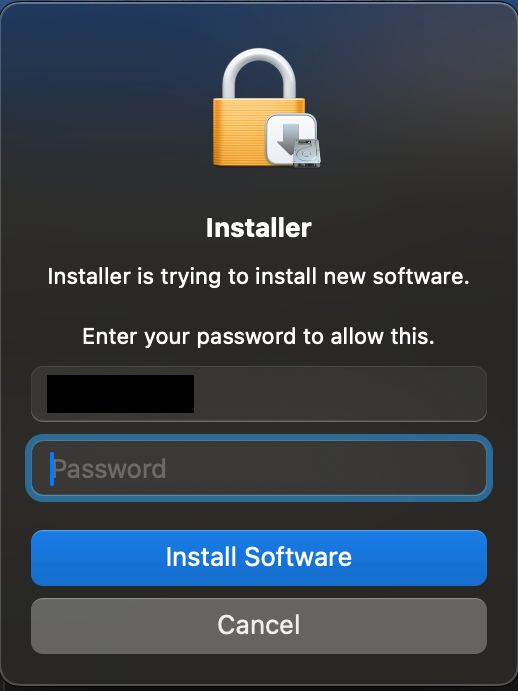
If a dialog opens with the title "Installer" and the message "Installer is trying to install new software", enter your password (Your Mac password, not the VPN password!). Click on "Install Software".

Initial Setup - Step 4
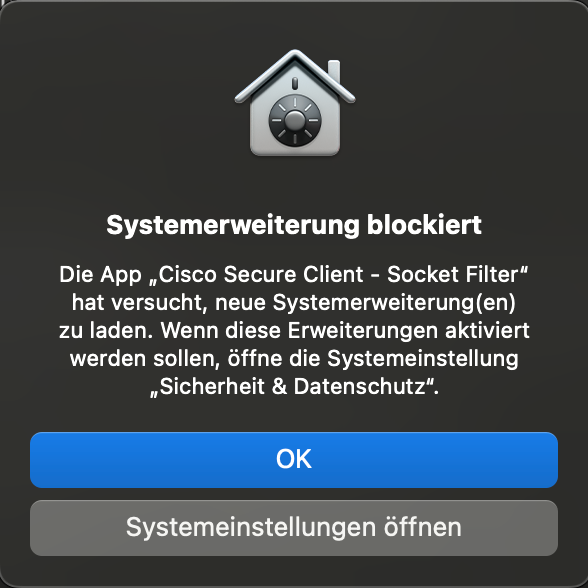
During the installation, you will be informed that Cisco Secure Client has been blocked for the time being and that you have to unblock this on your own. Now click on the blue highlighted button "Open the settings".
You should now be in the "Privacy & Security" menu item. Scroll down until you come across the text "Loading the system software of the 'Cisco Secure Client - Socker Filter' program has been blocked" under the "Security" point. Now click on "Allow." If the dialog "Privacy & Security" with the message "Privacy & Security is trying to modify your system settings." is shown, enter your Mac password (not the VPN password!) and click "Modify Settings".
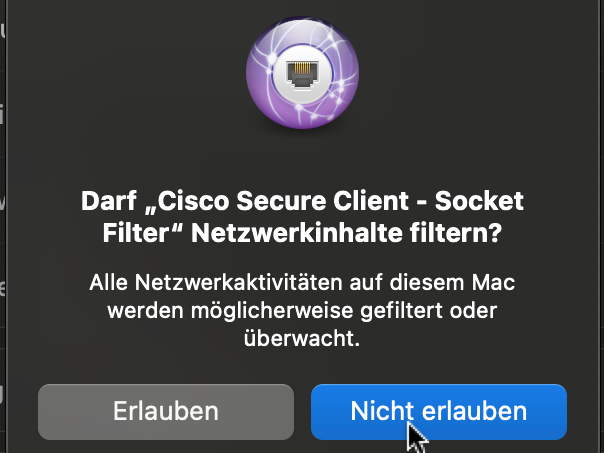
Furthermore there might popup a dialog saying "Should Cisco Secure Client - Socket Filter be allowed to filter Network contents?". If this happens click on "Allow".
Important! If you block the system extension from being allowed, Cisco Secure Client will not work completely.
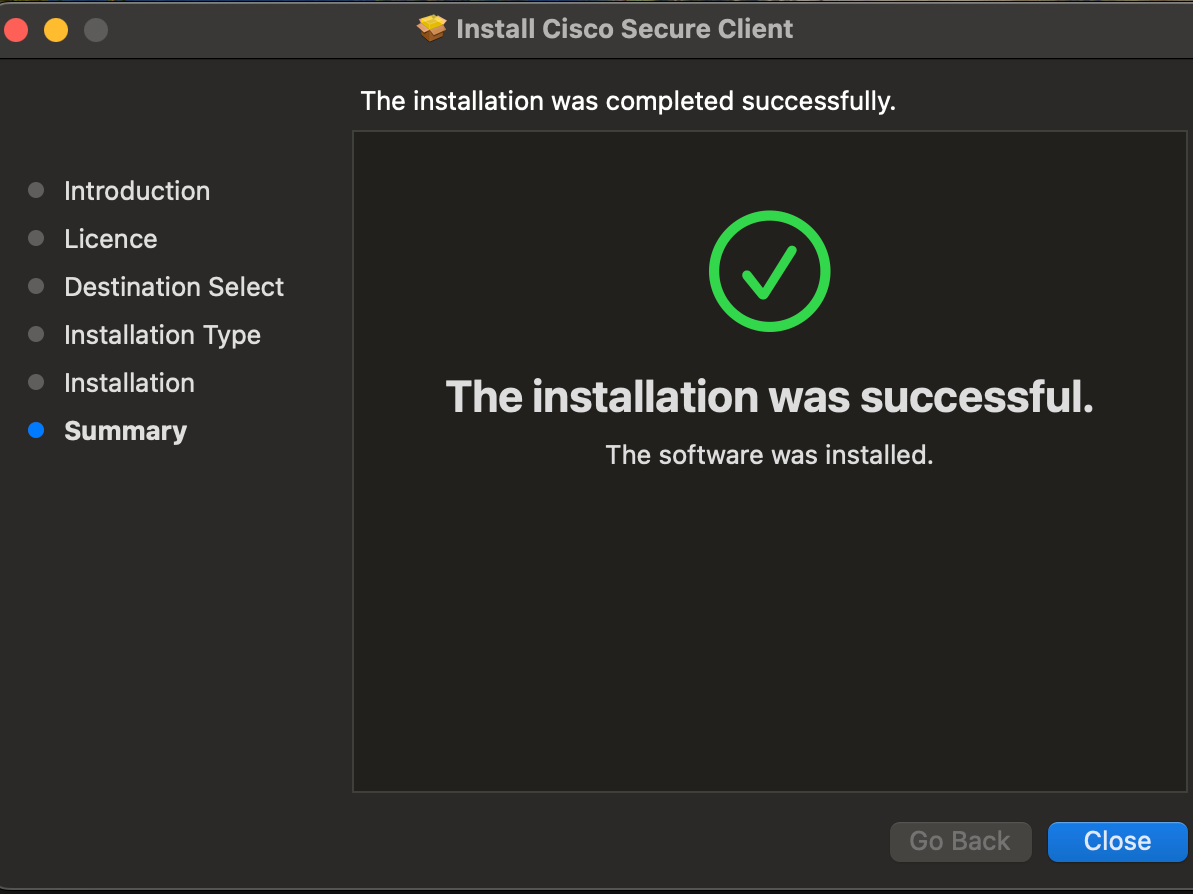
The install is now finished.
Initial Setup - Step 5
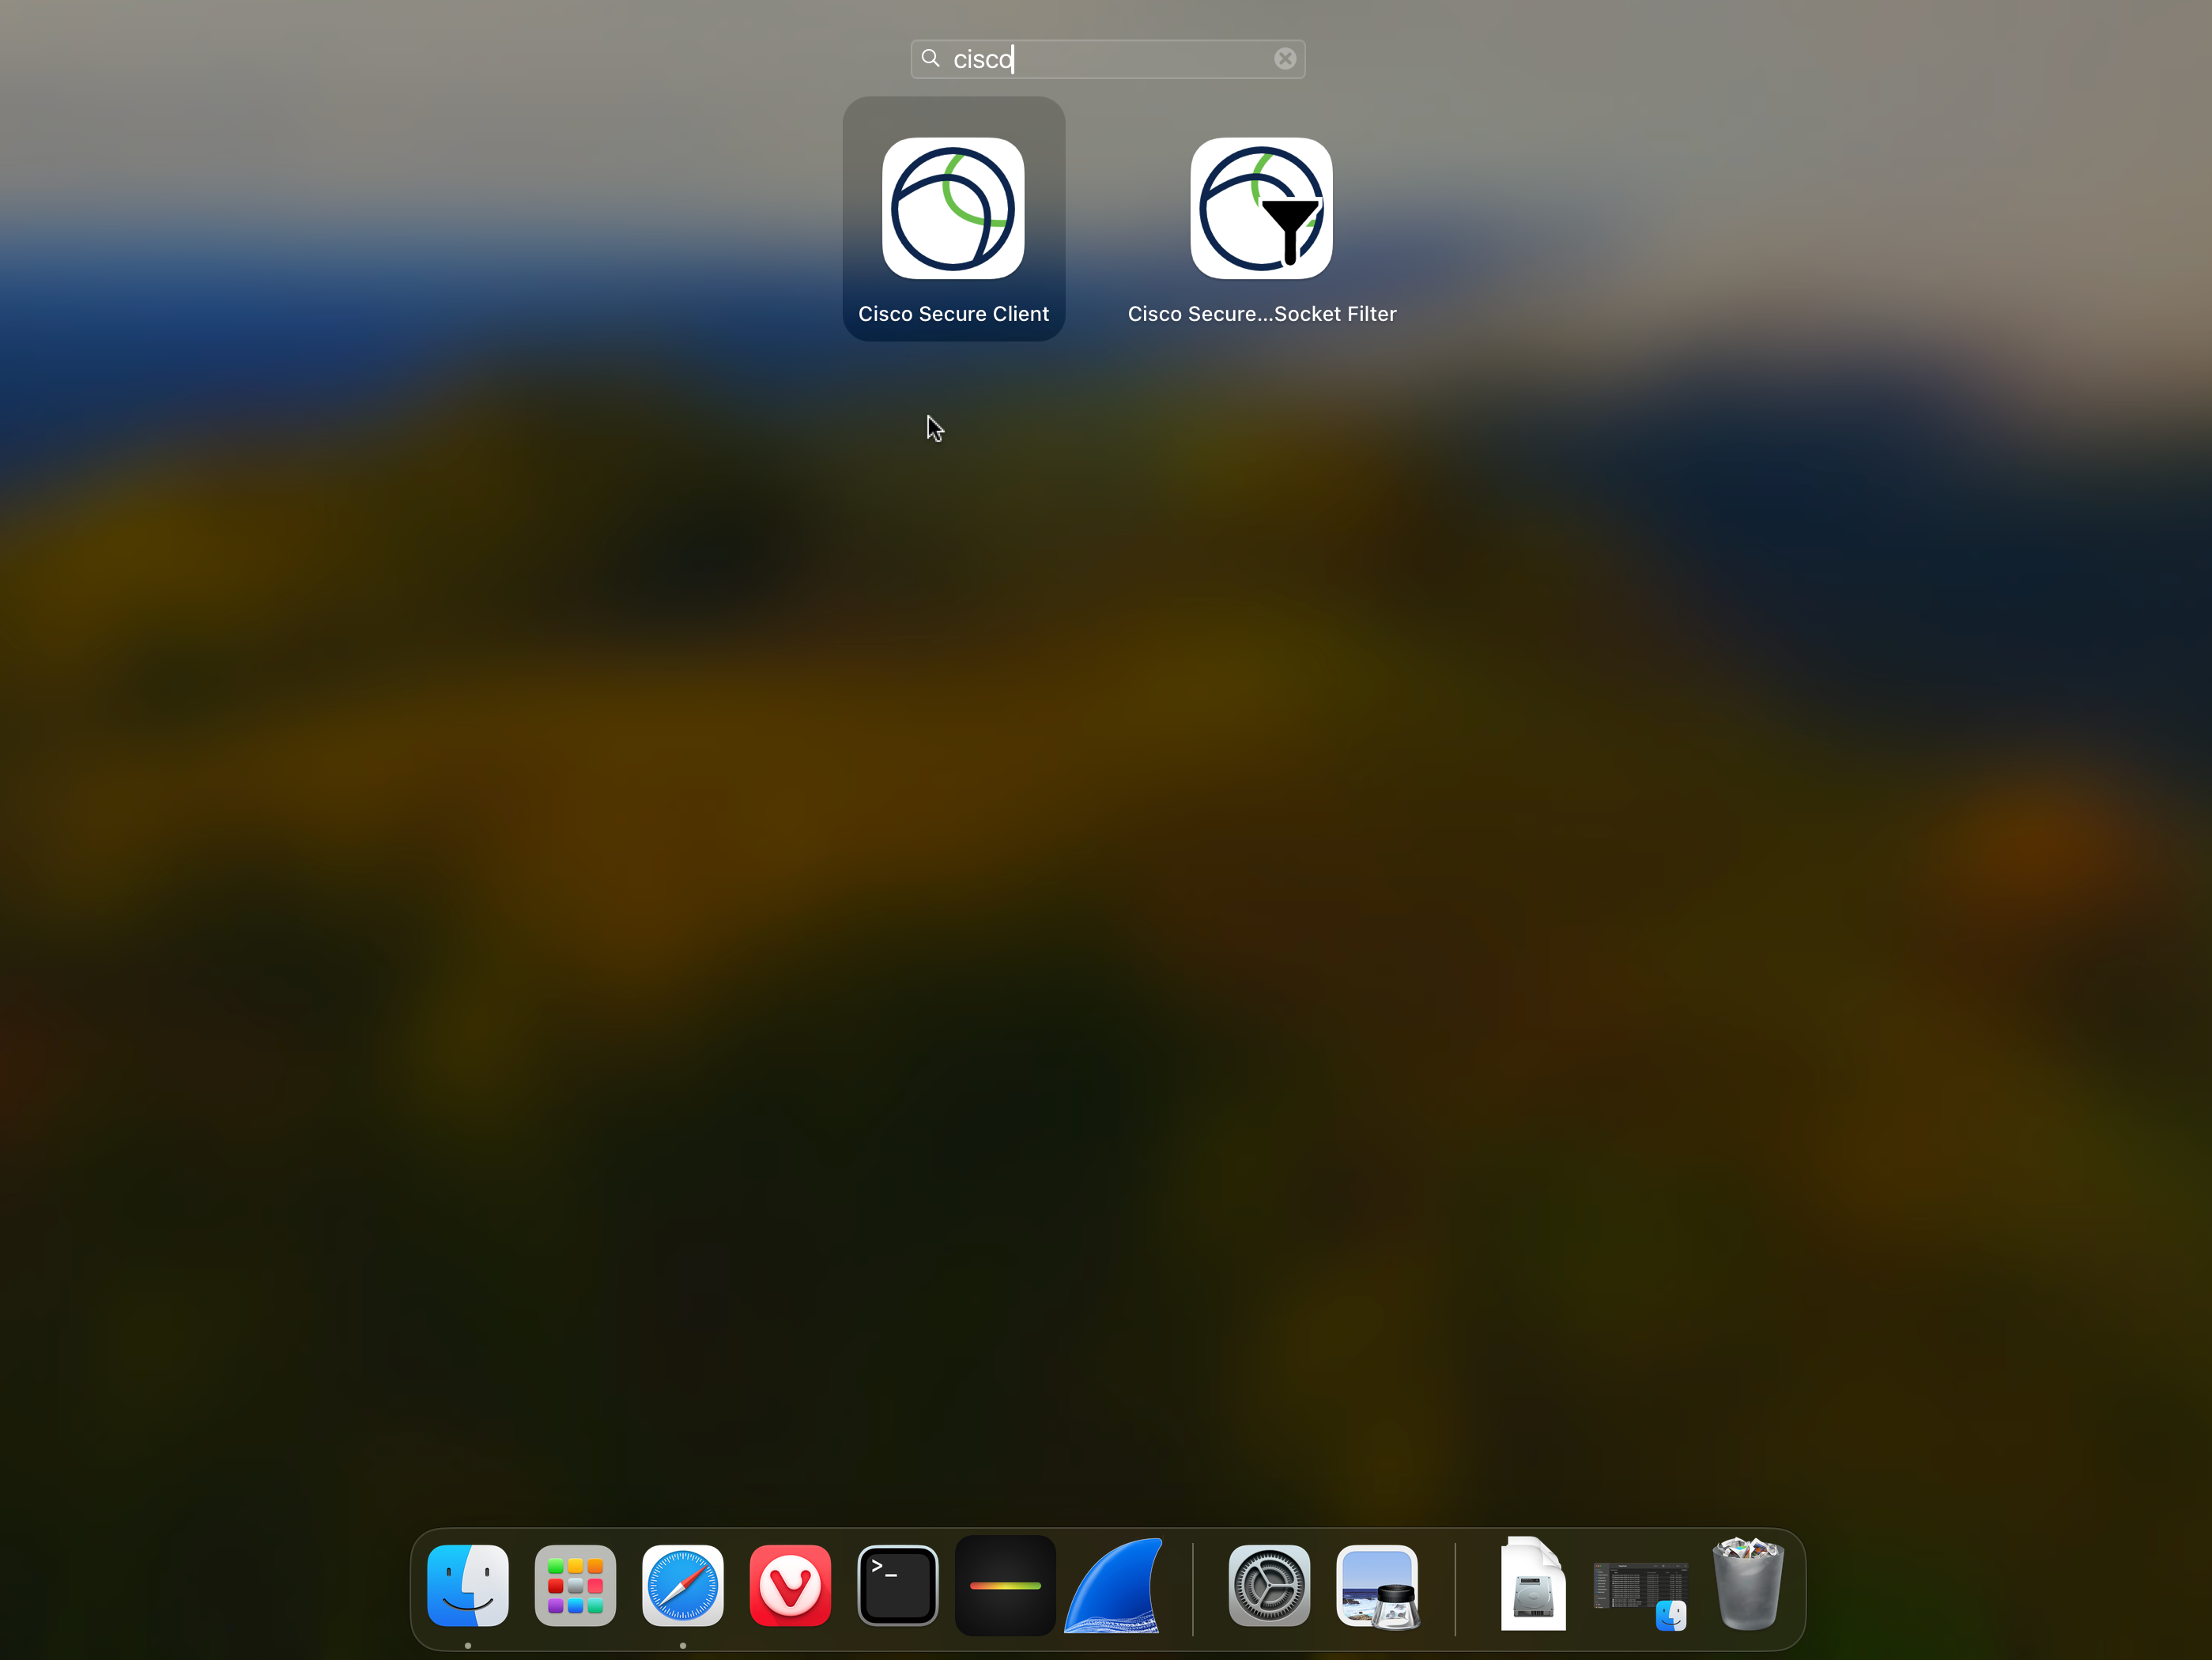
Start the "Cisco Secure Client", e.g. via the Launchpad.
Do NOT start the Cisco Secure Client Socket Filter. This is only a background service.

Initial Setup - Step 6
Open the "Preferences" by clicking on the gear icon at the bottom left and then click on "Preferences".
Place a check mark next to "Allow local (LAN) access when using VPN (if configured)". This will allow you to still access resources on your local network (printers or file shares, for example) even when the VPN connection is enabled. Close the window afterwards.

Connect - Step 1
Start the "Cisco Secure Client", e.g. via the Launchpad.
Do NOT start the Cisco Secure Client Socket Filter. This is only a background service.
Connect - Step 2
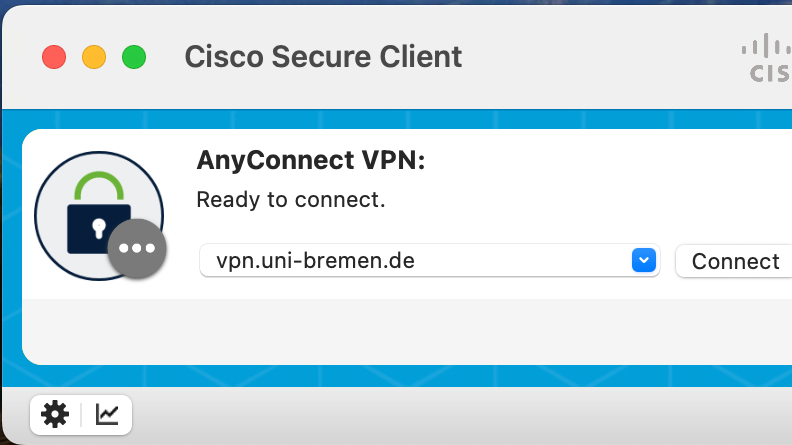
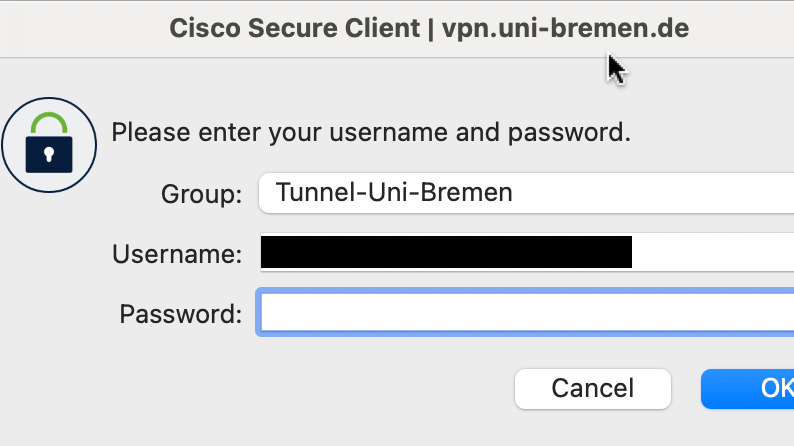
Enter "vpn.uni-bremen.de" in the text input in front of the "Connect" button, if it is not already filled in. To connect, simply click on "Connect".
Connect - Step 3
Enter the credentials for your university account in form of username and password. The credentials data cannot be saved and must be entered again for each connection.
Finally select the correct tunnel type under "Group" and confirm with "Connect" The program should now establish the connection.
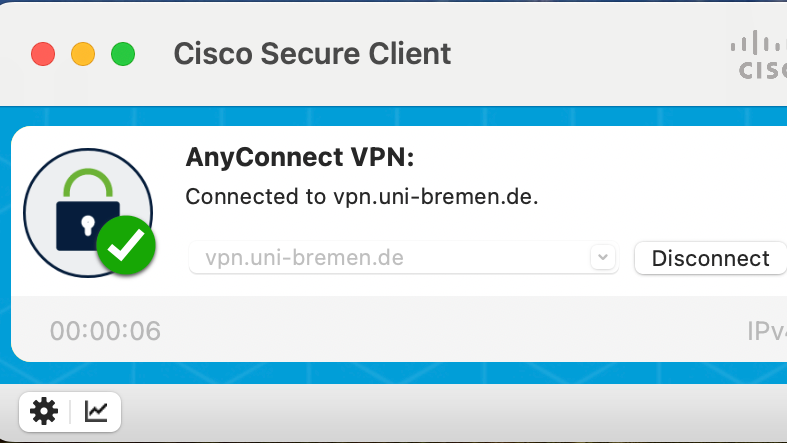
Disconnect connection
If you no longer need the connection, click on the AnyConnect icon in the panel and select "Disconnect".
Troubleshooting
Here you will find common errors related to the Cisco Secure Client and how to fix them.
I can't download the VPN software from vpn.uni-bremen.de and i get the error message "Forbidden".
Not all university users can access the VPN service. In particular, alumni are excluded from use.
If you are a regular member of the university (e. g. a regular student or employee) or SuUB staff member, please contact the Account Administration to have your account assignments checked.
I have successfully established a VPN connection, but i can't use the library services
If you want to use services that are enabled for the network area of the University of Bremen but are not "hosted" in the network area of the university (publishers are an example here), then you have to change the group from "Tunnel-Uni-Bremen" to "Tunnel-all-Traffic" when setting up a connection. For a detailed explanation please read the page VPN-Tunnel-Types.
ATTENTION: With this option, all traffic is now routed through the tunnel. Please leave the tunnel activated with this option only as long as it is needed for working.
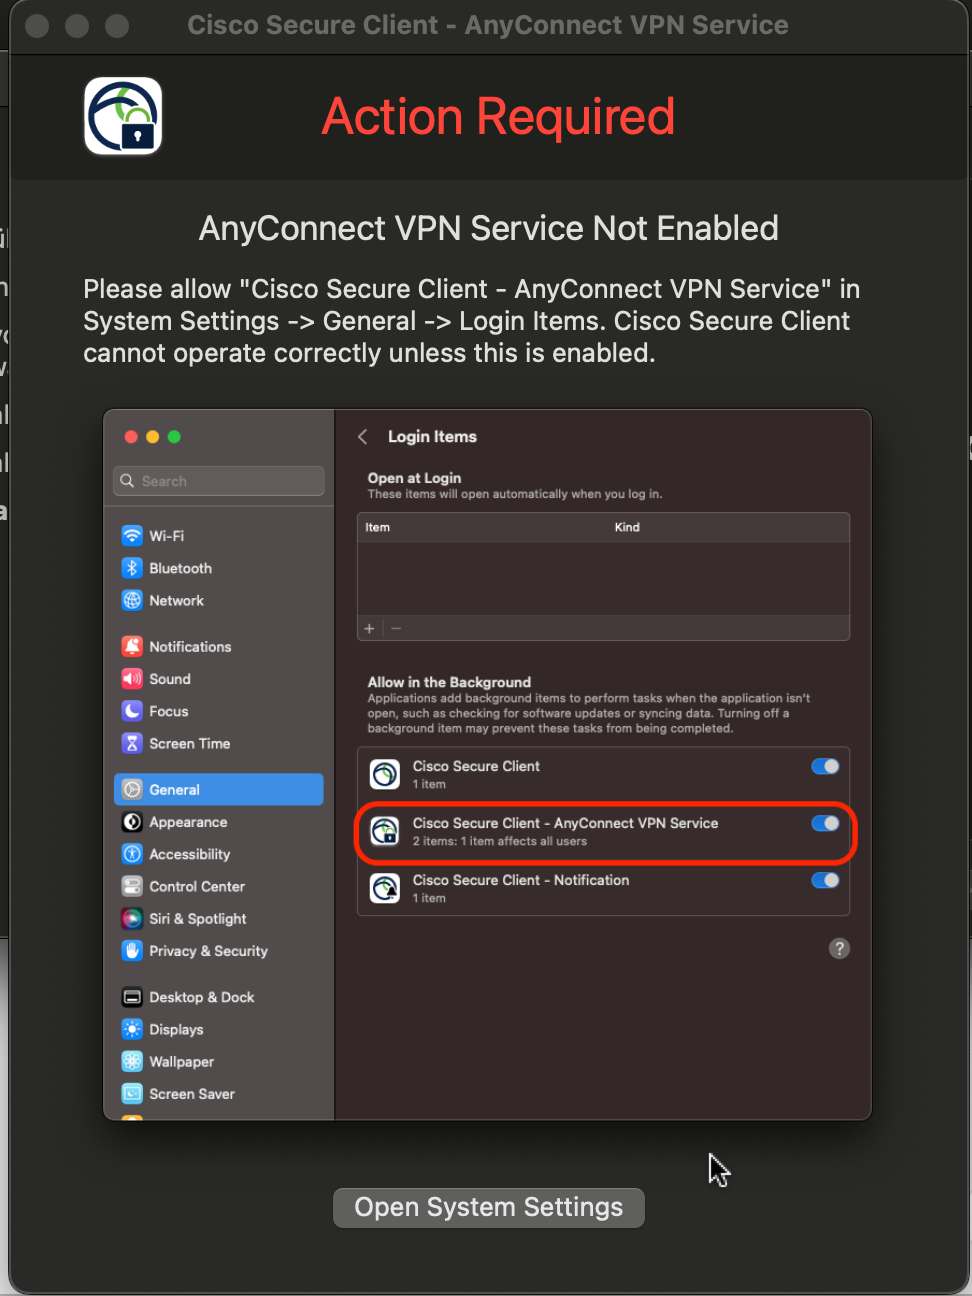
I'm seeing a dialog with the warning "Action Required" - Anyconnect VPN Service is Not Enabled
If your Mac displays the dialog "Action Required" with the message "AnyConnect VPN Service Not Enabled" do the following:
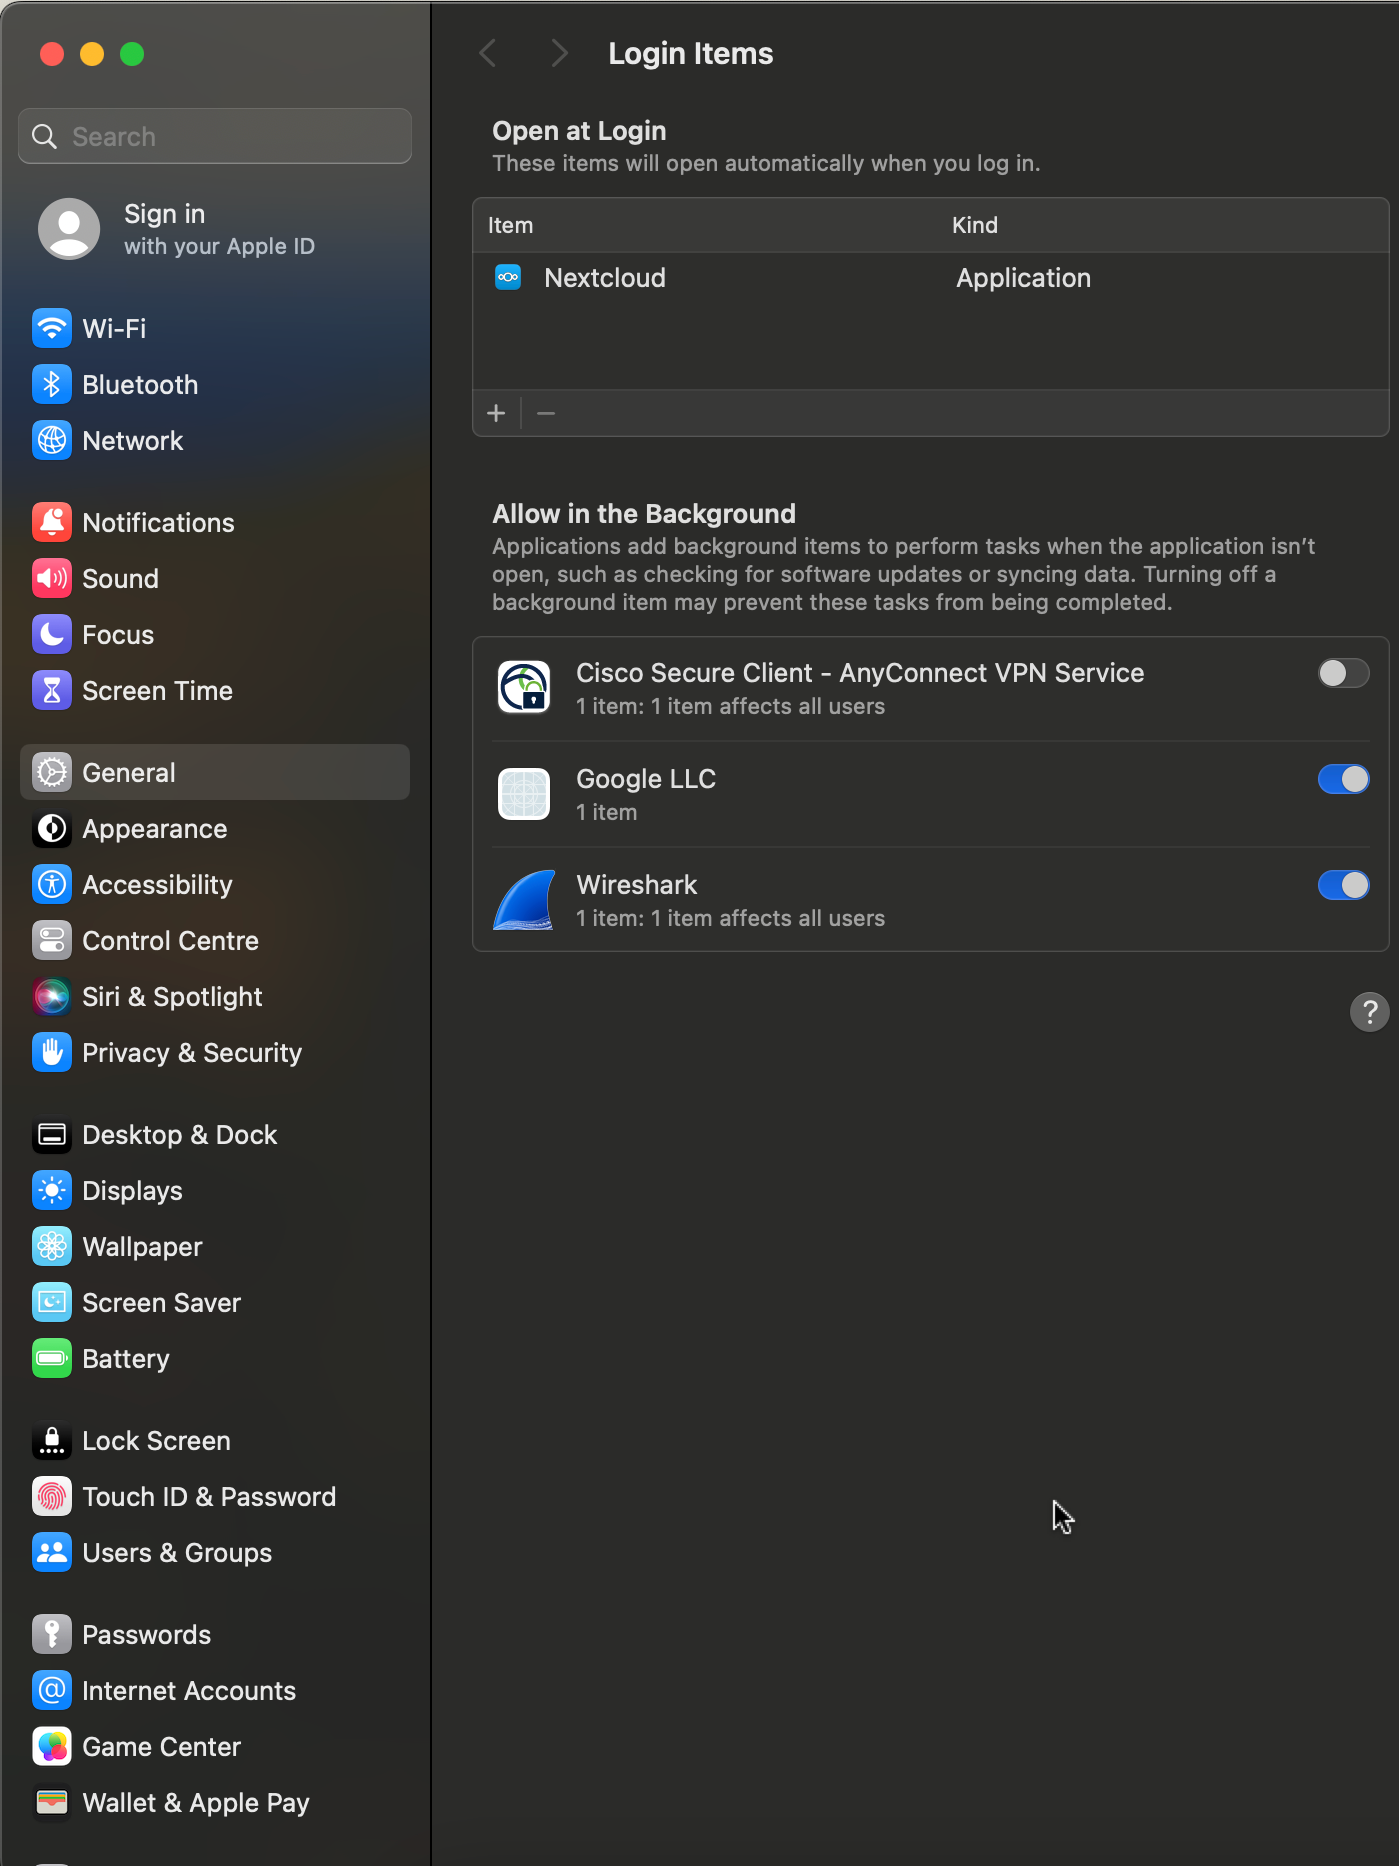
Click on the button "Open System Settings" in the dialog.
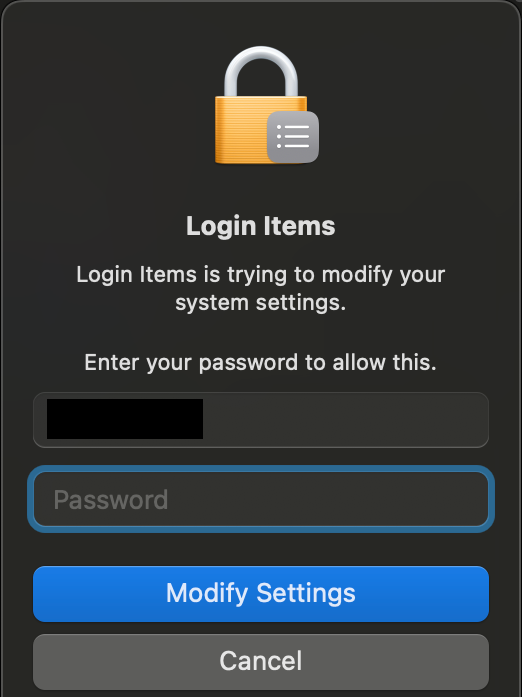
The dialog "System setting - General - Login items" should open. There should be a list with the heading "Allow in the background". In the list there should be an entry "Cisco Secure Client - AnyConnect VPN Service". Activate the service by clicking on the switch on the right after the entry. There should now be a dialog "Login items is trying to modify system settings". Enter your Mac password and click on "Modify setting". The "Action Required" dialog should't appear anymore.
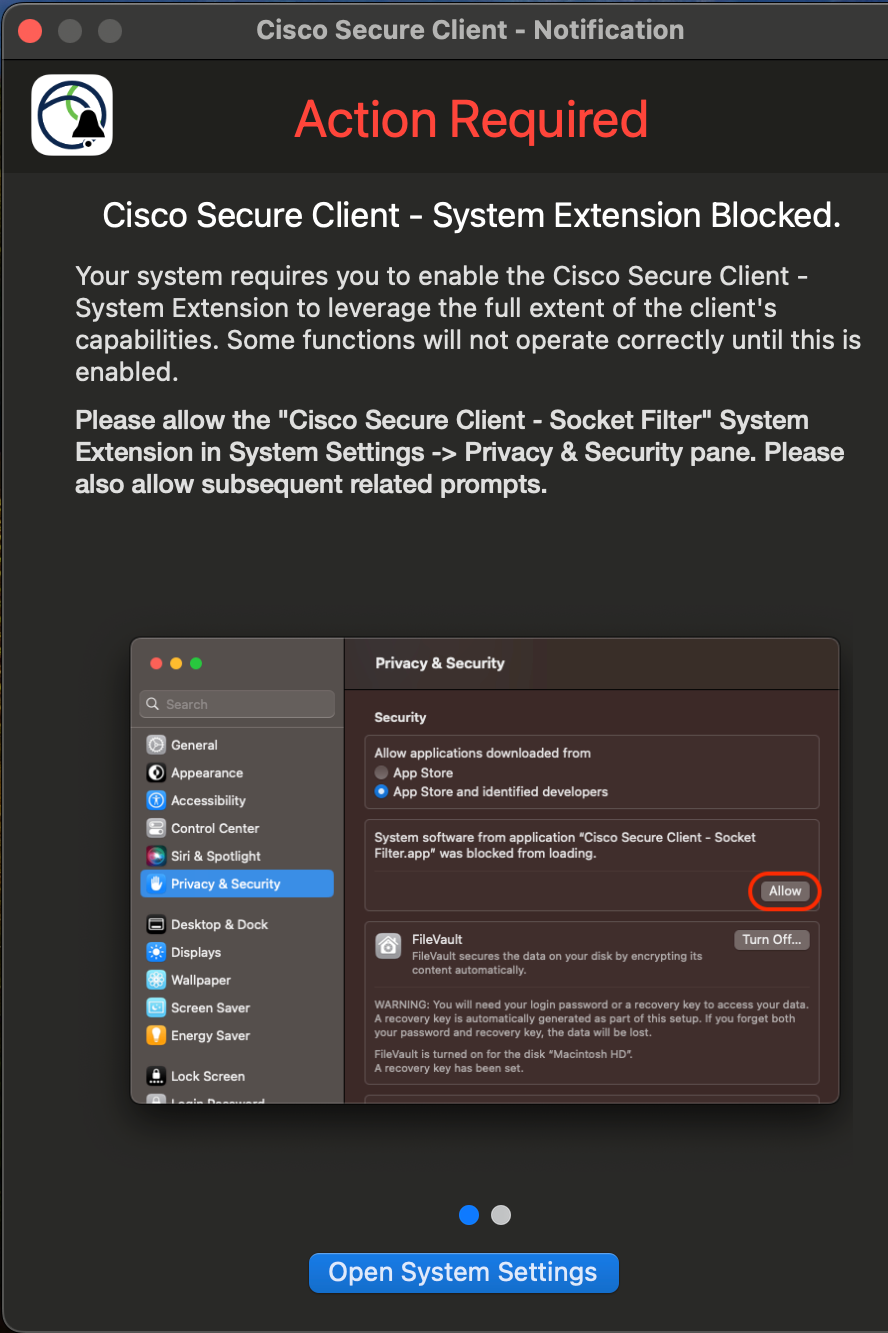
I see the window "Action required" - Cisco Secure Client - System Extension Blocked
When the dialog "Action Required - Cisco Secure Client - System Extension Blocked" is shown, do the following:
Click on "Open System Settings" in the dialog.
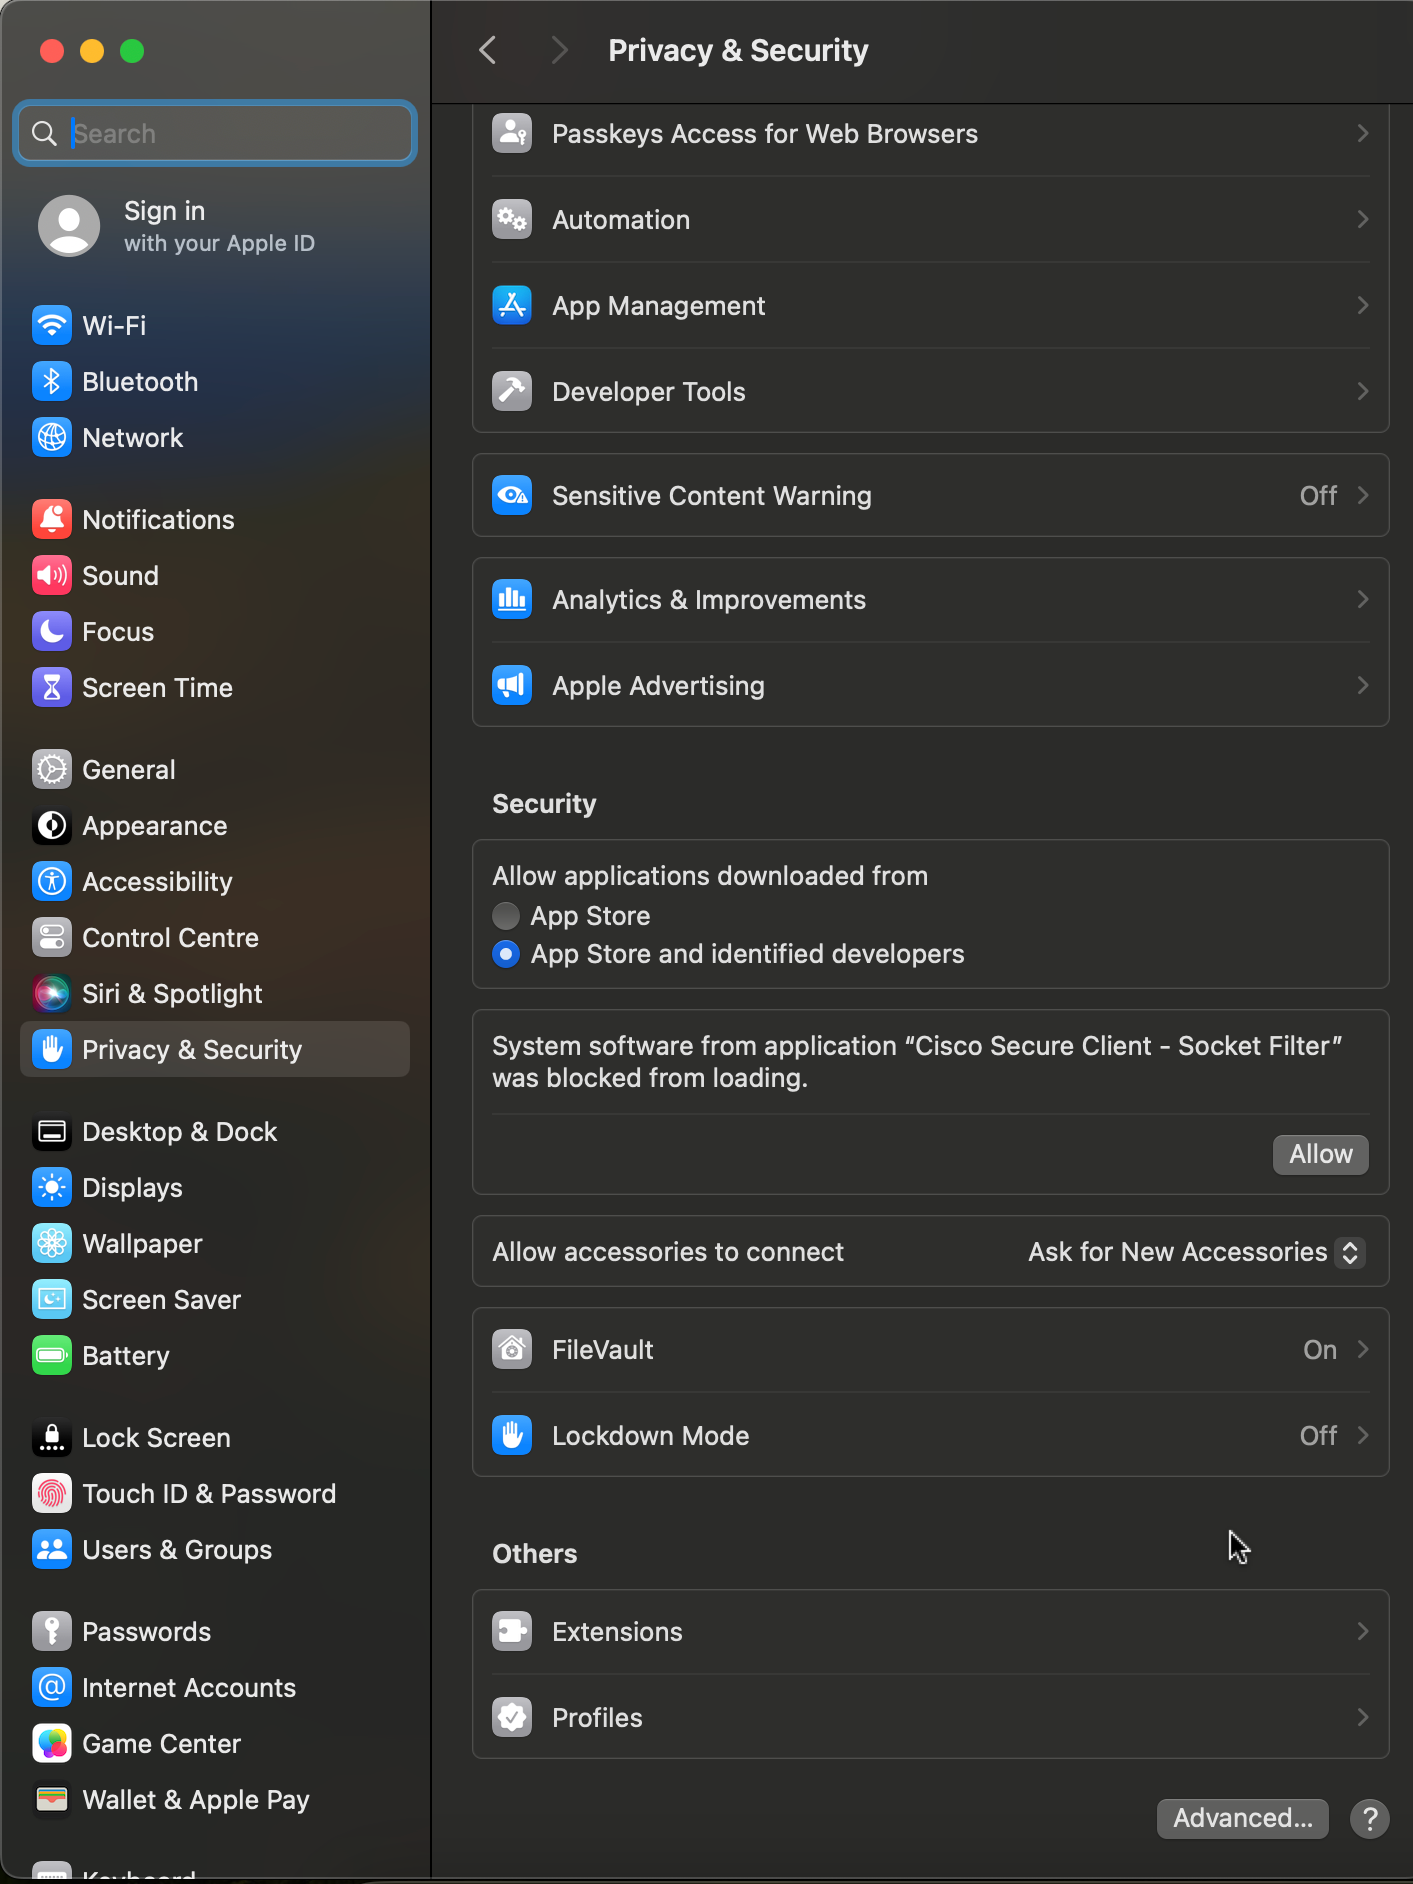
You should now see the system settings for "Privacy & Security". There should be a paragraph saying "System software from application "Cisco Secure Client - Socket Filter" was blocked from loading. Click the "Allow" button behind the paragraph.
There might be a popup window "Privacy & Security is trying to modify your system settings". If you see it, enter your password and click on modify settings.
There also might be a popup window "Should Cisco Secure Client be allowed to filter network contents?". Click on "Allow".
When connecting, I receive the message "AnyConnect was not able to establish a connection to the specified secure gateway"
The version of your VPN client is too old. Uninstall/delete the AnyConnect client and install the Cisco Secure Client according to the instructions on this page.

I get the message "Connect capability is unavailable because the VPN service is unavailable" when connecting
If you receive the error message “Connect capability is unavailable because the VPN service is unavailable” when connecting the VPN client, please do the following:
Uninstall the VPN client as follows:
Open a MacOS "Terminal" window (Enter "Terminal" in Launchpad).
Enter the following in the Terminal window:
sudo /opt/cisco/secureclient/bin/cisco_secure_client_uninstall.sh
(confirm with Enter)
The VPN client should then uninstall itself.
Then reinstall the VPN-Client according to our guide.