[Translate to English:] Screencasts mit Opencast Studio

Screencasts with Opencast Studio
There are many possibilities and software for recording webcam and screen. We describe here a very simple possibility that can be implemented without installing any software.
The description shows the scenario using the browser Firefox on a desktop PC as an example
1. Use Opencast Studio
There are two different ways to call Opencast Studio:
1. Via the Opencast plug-in in Stud.IP. Under "Actions", "Record video" you can call up Opencast Studio. Instructions on how to activate and set up the Opencast plug-in in your course can be found here.
2. Go to the address https://cast.zmml.uni-bremen.de/
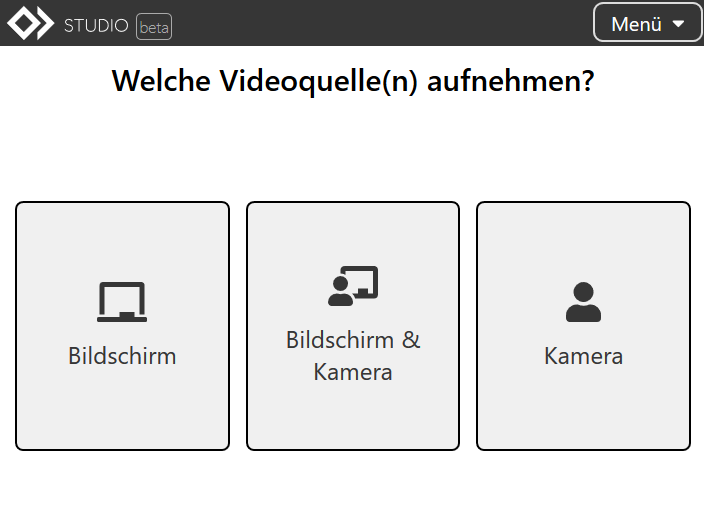
Here you have three choices:
Screen: Here you can record the window of your application (e.g. PDF reader, PowerPoint) or the whole screen including audio. The whole screen is particularly useful if you want to record PowerPoint presentations, for example, or if you want to switch between different applications or windows during the recording.
Screen and camera: Here, both the image of the webcam and the screen are recorded and then delivered in separate videos. The Opencast video player is technically capable of playing two videos synchronously side by side. If you do not record directly from Stud.IP, download the two files to your hard drive and upload them again in the Opencast plug-in in Stud.IP. You can find instructions on how to do this here.
Camera: Here, only the picture taken by the webcam is recorded. This setting is suitable for purely oral presentations.
In the following, option 1. for recording an application is described in a separate window.
2. Granting permissions
- As soon as you have selected Screen, the browser asks which window or screen may be shared. Select the window of the running presentation programme and click on Allow. The checkbox "Remember decision" should not be activated so that you can still change your decision for later recordings.
- You can now change the selection or go to the next step by clicking Next.
- Decide whether you want to record the screencast with or without your voice. As a rule, you will select Microphone here. The browser will offer you a list of your connected recording devices (headset, webcam microphone, etc.). Select the microphone, activate "Remember decision" and click on Allow and Next.
- In the following window you can test the function of the microphone. The yellow line should show clear deflections as soon as you speak at normal volume. Click on Next
- Now you can start the recording by clicking on the red button.
3. Recording
- After you have started the recording, switch to the window of your application (e.g. PDF reader).
Attention: If you now switch to PowerPoint and then start the presentation, the recording will not work. For Powerpoint presentations, use the recording of the whole screen instead).
All screen activities in the selected window (e.g. page change in PDF) are now recorded. Don't worry about slips of the tongue and small mistakes, just let the recording run. The presentation thus becomes authentic and can later be made available to your own students on a limited basis. It makes sense to divide your presentation into smaller thematic units of 10 to 20 minutes each and make them available later as a series of individual videos. This way, it is easier for your students to orientate themselves to the topic and you can more easily re-record individual parts if necessary. - As soon as you finish recording, you can view and check the recording in the browser. At this point, you can still decide to discard or re-record the recording.
- After clicking Next, you can save the video file by clicking Download. Do not forget to give the video a descriptive name (e.g. Lecture Recording Genetics#1_2020-03-13).
- If you have called up Opencast Studio directly in Stud.IP from your course, you can upload directly to Opencast without detours. In the "Upload to Opencast" dialogue box, enter a title for the video and your name and start the upload process by clicking on the green Upload to Opencast button. For your own safety, always download the video files to your computer so that you can upload your video again if necessary.
- Please note: the direct upload to Opencast is not available on the https://cast.zmml.uni-bremen.de website.
Depending on which browser you use, Opencast Studio will generate a video in either WEBM, MKV or MP4 format. All formats can be played with the free VLC-Player player, for example. In any case, you should try to reduce the file size with a conversion tool such as Handbrake(for settings, see the instruction). A 90-minute recording with Opencast Studio can be up to 2 GB! in size; with a normal DSL line outside the campus network, the upload would take very long and probably break off at some point.
IMPORTANT: For large video files, do not use the file area (max. 40MB) or the Videomanager (max. 500MB), but the Opencast-PlugIn in Stud.IP. With the help of the Opencast edit editor, you can edit your recordings uploaded to Stud.IP and, for example, also adjust metadata such as the title. (You can find instructions on how to use the editing tool here)
TIPS: First make a short test recording to practise the procedure and to check
 and check the sound quality. If you want to change the permission settings
 the permission settings made in step two, you will need to delete the browser cache
 and cookies for this page.
